Getting started with 3D modeling for 3D printing
Published at: September 16th 2025

Introduction to 3D modeling
3D modeling is the process of creating a digital representation of a three-dimensional object using specialized software. This digital model can then be used for various purposes, including visualization, animation, or physical creation using 3D printing.
Key concepts
Meshes
The primary building blocks of 3D models.
A mesh is a collection of:
- Vertices: Points in 3D space that define the corners or key positions
- Edges: Lines connecting vertices.
- Faces: Surfaces enclosed by edges, usually forming polygons .
Polygons
Faces of a mesh usually consist of polygons (often triangles or quads).
CAD (Computer-Aided Design)
Software used for precision engineering and technical designs.
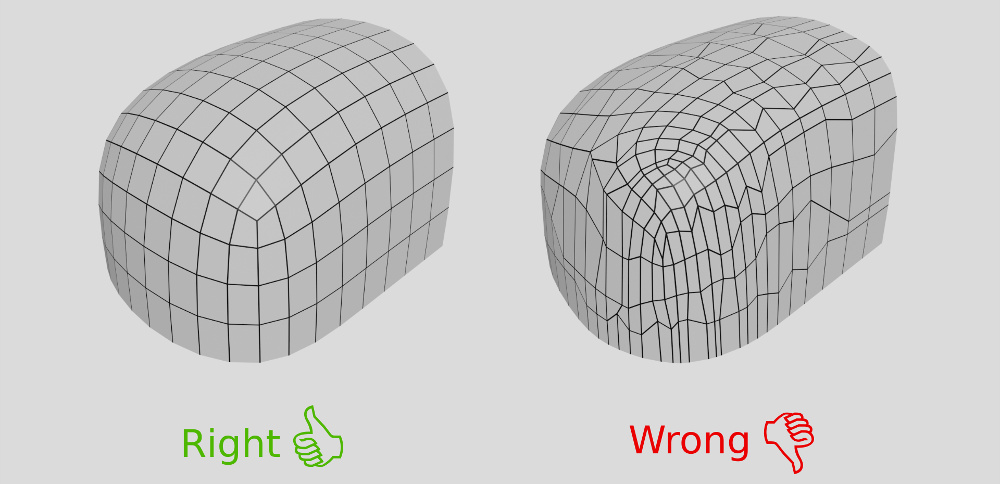
Basic principles of 3D modeling for 3D printing

source: https://www.soft8soft.com/docs/files/optimization-techniques/topology.jpg
Model types
- Solid models: Represent solid volumes and are most commonly used for 3D printing.
- Surface models: Define the surface without filling in the interior.
- Mesh models: Represent objects as interconnected triangles or polygons.
- Point cloud models: Represent objects as a collection of data points in 3D space, usually obtained via 3D scanning. Point clouds can be converted into mesh models for 3D printing but are typically not printable directly.
File formats
- STL (Standard Triangle Language): The most common format for 3D printing, representing surfaces as triangles.
- OBJ: Supports textures and colors.
- AMF (Additive Manufacturing File): Supports colors and materials.
- 3MF (3D Manufacturing Format): Microsoft format for advanced data representation.
Design rules and tolerances
- Wall thickness: Ensure your model has enough thickness to be printable.
- Overhangs and supports: Consider the need for support structures in your design.
- Bridging: Understand your printer's ability to print horizontal spans.
Getting started with Tinkercad
Tinkercad is a beginner-friendly, browser-based 3D modeling tool perfect for first-time users.
Features of Tinkercad
- Basic shapes: Drag-and-drop basic shapes like cubes, cylinders, etc.
- Grouping & Aligning: Combine and align shapes to form complex objects.
- Import & Export: Import existing models or export your design for 3D printing.
- Tutorials: Built-in tutorials for easy learning.
Steps to use Tinkercad
- Sign Up: Create a free account at tinkercad.com.
- Create a New Project: Click "Create New Design."
- Drag & Drop Shapes: Choose shapes from the sidebar.
- Edit Shapes:
- Size & Position: Adjust using the control handles.
- Combine Shapes: Use "Group" to merge multiple shapes.
5. Export the Model: Click "Export" to download the file in STL or OBJ format.
Tinkercad cheatsheet

Other free 3D modeling tools
Blender
- Features: Advanced modeling, sculpting, animation, and rendering.
- Best for: Intermediate to advanced users.
- Resources: Tons of tutorials online.
- Website: blender.org
FreeCAD
- Features: Parametric modeling for engineering designs.
- Best for: Precision engineering and CAD designs.
- Resources: Active online community and wiki.
- Website: freecadweb.org
Fusion 360 (free for students/hobbyists)
- Features: Powerful CAD, CAM, and CAE tools.
- Best for: Advanced projects and product design.
- Resources: Extensive tutorials by Autodesk.
- Website: autodesk.com/products/fusion-360
SketchUp Free
- Features: Intuitive modeling for architectural and basic 3D shapes.
- Best for: Beginners interested in simple designs.
- Resources: Free learning center and community tutorials.
- Website: sketchup.com
OpenSCAD
- Features: Programmatic 3D modeling using code.
- Best for: Users comfortable with scripting.
- Resources: Comprehensive user manual and examples.
- Website: openscad.org
3D Modeling workflow for 3D printed parts
1. Concept and planning
- Define the purpose:
- Decide what you want to create (e.g., phone stand, gear, figurine).
- Make sure the part is practical and achievable for 3D printing.
- Gather references:
- Find images, sketches, or drawings to help guide your design.
- Check existing designs online for inspiration.
2. Initial 3D model creation
- Choose your software:
- Beginners: Tinkercad, SketchUp
- Intermediate/Advanced: Fusion 360, Blender
- Create the basic shape:
- Start with simple shapes like cubes, cylinders, or spheres.
- Adjust size, scale, and position using the software's transformation tools.
3. Detailed modeling and refinement
- Add features:
- Add holes, slots, or other design elements.
- Use tools like extrude, bevel, and mirror to refine your model.
- Check details:
- Ensure important details (e.g., wall thickness, grooves) are present.
4. Model integrity checks
- Check wall thickness:
- Ensure walls are thick enough to be printed
- Fix holes and gaps:
- Make sure the model is watertight (no open areas or gaps).
- Non-manifold edges:
- Repair edges shared by more than two faces.
5. Optimization for 3D printing
- Orient the model:
- Place the model in the optimal printing orientation to minimize supports.
- Add support structures:
- If needed, design support structures manually or leave this to slicing software.
- Hollow out large models:
- For large models, make them hollow to reduce material usage.
6. Export and slicing
- Export the model:
- Export the 3D model in STL, OBJ, or 3MF format.
- Ensure the correct unit settings are applied.
- Import to slicing software:
- Use software like Cura, PrusaSlicer, or Simplify3D.
- Set layer height, infill, supports, and other print settings.
- Generate G-code:
7. Test printing and iteration
- Test print the model:
- Assess print quality:
- Refine the design:
Online resources
- Tutorials and courses:
- Blender Guru tutorials
- Fusion 360 tutorials
- Tinkercad academy
- Communities and forums:
Sources:
https://www.instructables.com/TinkerCAD-Tutorial-1/
https://www.soft8soft.com/docs/manual/en/introduction/Optimizing-WebGL-performance.html
https://www.autodesk.com/products/fusion-360/overview